Showing posts with label Android Tips. Show all posts

Monday, 3 April 2017

Reasons to Disable Auto Start Applications And How To Disable Auto Start Applications On Infinix And Other Android Devices With XManger

Reasons to Disable Auto Start Applications And How To Disable Auto Start Applications On Infinix And Other Android Devices With XManger

From our previous write up, we considered How To Lock Android Apps With Password  On Infinix And Other Android Devices With XManger. With the same third party application, we'll also be considering how to Disable Auto Start Applications.

There are so many reasons factors that makes apps to be disabled from auto starting at the booting of an Android Smartphone. Below are simple reasons why you should disable some applications from auto starting at the booting of your Android device.


Reasons To Disable Some App From Auto Starting
  • Apps like Facebook, Messenger, Whatsapp and Browsers exhaust more RAM of your device, and once not disabled, this applications automatically start at the powering on of your device.
  • Some Apps are high data accumulator, that uses background data without making use of them. And once not disabled and your device is powered on, they start automatically to exhaust your data. 
  • Battery draining applications finds it very easy to drain your battery as quick as possible if they are not disabled from starting automatically from boot. 
After considering the factors above, some applications are not really necessary to start at boot. So in that case, they should be disabled and rather be powered on by oneself. Below are steps and guilds on how to disable Auto Start Applications On Infinix Hot Mobiles and Other Android Devices with XManger.


 How To Disable Auto Start Applications On Infinix Hot Devices And Other Android Devices With XManger

Follow the Steps Below To Disable Auto Start Applications With XManger.

Step 1==> Locate XManger on your Menu (inbuilt app for Infinix Hot and some devices) or download app from Google Play Store.

Step 2==> Click Auto-Start Manager.

Step 3==> Switch from Off to On

Step 4==> Select Applications To Disable or Enable To Auto Start At Boot. 

Sunday, 2 April 2017

How To Lock Android Apps With Password Or Pattern On Infinix And Other Android Devices With XManger

How To Lock Android Apps With Password Or Pattern On Infinix And Other Android Devices With XManger


Locking your Android apps gives a total privacy to confidential documents. Locking Android apps on Infinix Hot 3 LTE, Hot 3 Pro, Hot 4 LTE and Hot 4 Pro, tends to be somehow hidden. If not very observant, you'll find it difficult to lock your Android Applications with the Infinix inbuilt third application, but you'd rather choose to download other third party applications from Google Play Store.

The procedures to lock Android Applications on all device and Infinix Hot devices are clearly stated in this article. Follow the steps below know how to lock Android Apps on Infinix Hot mobiles (Mostly applicable to Android 6.0 Marshmallow)

 How To Lock Android App On Infinix Hot 3 LTE,  Hot 3 Pro, Infinix Hot 4 LTE and Hot 4 Pro Mobiles And Other Android Devices

Step 1==> Locate XManger on Your Menu

Step 2==> Launch and Click App Lock

Step 3==> Tap On

Step 4==> Choose to use either a Pattern or A Password (Involving Figures and Numbers)

Step 5==> Select the applications to lock


For users of other devices, XManger Can be gotten from Google Play Store, Or other third party App Store. 

Thursday, 9 February 2017

Secret Android Smartphone Codes All Android Users Should Know

Secret Android Smartphone Codes All Android Users Should Know


For all android smartphone users, try this secret codes! So as to be able to access all hidden menus, diagnostic and state of wireless networks, by dailing the codes.

THE CODES ARE LISTED BELOW

👉. *#*#3646633#*#* - MTK Engineering Mode

👉. *#06# – IMEI number


👉. *#0*# – Service menu on devices like the Galaxy S III


👉.  *#*#4636#*#* – Information about device, user statistics and battery


👉.  *#*#34971539#*#* – Details on camera


👉.  *#*#273282*255*663282*#*#* –Instant backup media files


👉.  *#*#197328640#*#* – Activating test mode devices


👉.  *#*#232339#*#* – Test for Wireless LAN


👉.  *#*#0842#*#* – Test for vibration and backlight


👉.  *#*#2664#*#* – Test for touch screen


👉. *#*#1111#*#* – FTA software version (in 1234 within the same code will provide a view of the PDA and firmware version)


👉. *#12580*369# – Information about the software and hardware


👉. *#9090# – Diagnostic information


👉. *#9900# –System dump mode


👉 . *#301279# – HSDPA / HSUPA Control Menu


👉 . *#7465625# – Look at the status of phone locks


👉 . *#*#7780#*#* –Resetting data to default settings


👉 . *2767*3855# – Formatting the device to default settings (warning – this deletes all date on the devices)


👉 . *#*#7594#*#* – After entering this code, your device will turn off


👉 . *#*#232338#*#* – Display Wi-Fi MAC address


👉 . *#*#1472365#*#* – Quick GPS test


👉 . *#*#1575#*#* – Extensive GPS test


👉 . *#*#0*#*#* – Test LCD screen


👉 . *#*#0289#*#* – Audio test


👉 . *#*#0588#*#* – Test proximity sensor


👉 . *#*#3264#*#* – Display RAM version


👉 . *#*#232331#*#* – Bluetooth test


👉 . *#*#232337#*# – Bluetooth address


👉 . *#*#7262626#*#* – Field test


👉 . *#*#8255#*#* – Tracking Google Talk service


👉 . * # * # 3424 # * # * – test function for HTC devices


👉. *#*#4636#*#* – HTC info menu


👉. ##8626337# – Run VOCODER

Friday, 20 January 2017

How To Backup And Restore My Whatsapp Messages On My Android Phone Or iPhone.

How To Backup And Restore My Whatsapp Messages On My Android Phone Or iPhone.


WhatsApp is a tremendously useful way to keep in touch with people all over the world for free. There is a rather large problem that users can encounter though, and that is when moving onto a new phone by default their conversations don’t come with them. This is due to the way the app stores content locally rather than on web servers. If you still have your old phone to hand, and haven’t switched from Android to iOS or vice versa, then it’s still possible to salvage those old chats and move them safely to a new home. In this guide we’ll take you through the short process of copying and restoring your digital missives.

How to back up WhatsApp messages, how to restore WhatsApp messages to a new phone: iPhone
There are a few different ways to keep your conversations on your iPhone, but the easiest is by using iCloud backup. To do this you’ll need to take your old handset and go to WhatsApp Settings, Chats, Chat Backup and then tap Backup Now.
restore whatsapp chat history
On your new handset, reinstall WhatsApp, confirm your phone number (which has to be the same as the one used on your old phone) and you will be prompted to restore your chat history. Agree to this and your backup should be installed, replete with your conversations. It’s also worth going back to the settings and enabling the Auto Backup feature now, so you’ll be good to go when you upgrade to your next iPhone in a couple of years time. 

How to back up WhatsApp messages, how to restore WhatsApp messages to a new phone: Android
The easiest way to back up and restore WhatsApp messages between Android phones is to use Google Drive, since it's a free app that's available to all Android phones. You can also use an SD card if one is installed in your phone, but do so only if that SD card can be inserted to your new phone also. 
You will want to ensure you have Google Drive installed (and logged into the same Google account) on both new and old Android phones. 
Now open WhatsApp on the old Android phone, tap the three dots in the top right corner and choose Settings.


Select Chats, then Chat backup. Select Back Up to back up your WhatsApp chat history to Google Drive.
Now, on the new phone, verify your WhatsApp account with your phone number. You will automatically be prompted to restore your WhatsApp messages from a Google Drive backup. Select the most recent backup and your messages will be restored in the background.

restore whatsapp chat history

How To Configure Network Type On your Android Device.

How To Configure Network Type On your Android Device.

Smartphone owners usually run into internet configuration problems after a updating to a more recent version of Android. We received quite a few complaints from users who experienced just this, so we decided to write up a quick and easy tutorial that will hopefully fix the issue. The tricky thing, for beginner users at least, is that connection settings, though they exist, are sometimes well hidden.

Android Nougat is a prime example of when this issue arose, forcing you to reconfigure your carrier settings often, as they’d be set to ones that would use up more data unnecessarily. In fact, this is one of the most common problems encountered by Nougat users.
The settings are sometimes changed as if by magic, or they return to their default state from when you first unboxed your Android smartphone or installed a custom ROM.

How to configure 4G / 3G / 2G on your Android
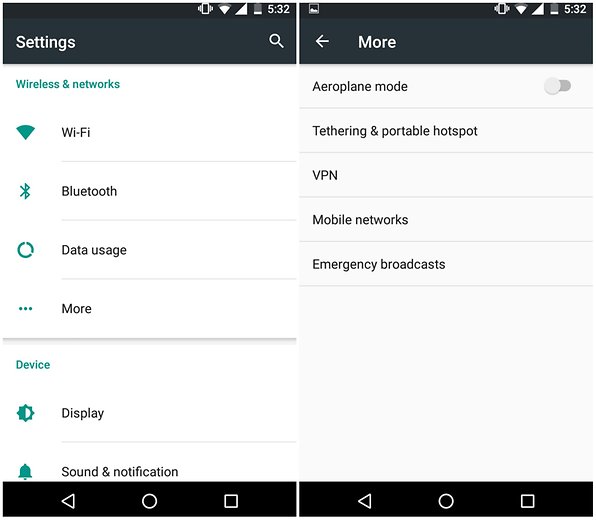
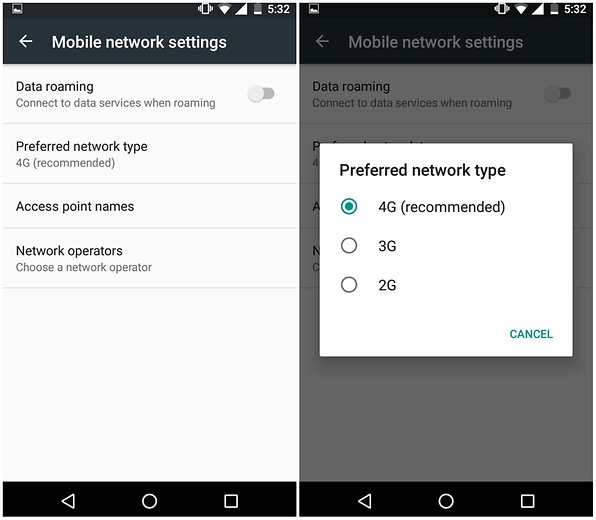
This tutorial can be used for any carrier that provides 2G, 3G or 4G, though the exact steps may vary slightly by device. Simply go to Settings, then MoreMobile networks and finally Preferred network type. There you can choose between the three options.


androidpit internet settings 1
First head to Settings and choose More. / © WebprofTech.ml
androidpit internet settings 2
After, select Mobile network settings and Preferred network Type. / © WebprofTech.ml

Depending on your data plan, being on 4G may use your allotted amount quicker than when using 3G, which is usually fast enough for normal smartphone usage and in any case saves data considerably.